Install OpenWRT on a PC
1.Prepare a bootable Debian USB
Download a Finnix image from here https://www.finnix.org/
If you are using Windows, flash the image using Rufus: https://rufus.akeo.ie/ if you are using Linux, use dd.
Connect a LAN cable to the first NIC port, insert the newly flashed USB and boot the system.
Use putty to connect to the serial port. Putty instructions for Windows are available here and for macOS here.
2. Connect to PC via SSH
By default, Rescue Mode’s Finnix environment does not accept SSH connections.
Set the root password for the Finnix rescue environment by entering the following command:
passwd
Enter the new password for the root user.
Start the SSH server:
service ssh start
You can now connect to the server as root with the SSH client on a local computer
Make sure you have the WAN cable connected, so you have a connection to the internet.
root@1:/# ping 8.8.8.8
PING 8.8.8.8 (8.8.8.8) 56(84) bytes of data.
64 bytes from 8.8.8.8: icmp_seq=1 ttl=114 time=17.1 ms
64 bytes from 8.8.8.8: icmp_seq=2 ttl=114 time=16.3 ms
3. Flash the HDD drive with the OpenWRT image
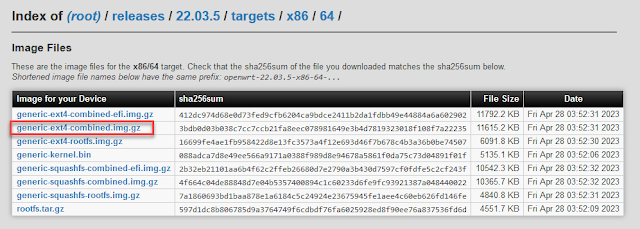
You can now download the latest OpenWRT image from here https://downloads.openwrt.org/releases. Make sure to download x86 / 64 / generic-ext4-combined.img.gz file.
We need an image called "generic-ext4-combined.img.gz". Make sure you get the ext4 image; otherwise, you won't be able to resize the partition and use the entire disk space.
wget https://downloads.openwrt.org/releases/22.03.5/targets/x86/64/openwrt-22.03.5-x86-64-generic-ext4-combined.img.gz This should go relatively quickly. Once it's downloaded, unpack it with
gunzip openwrt-22.03.5-x86-64-generic-ext4-combined.img.gz
This should produce a file named "openwrt-22.03.5-x86-64-generic-ext4-combined.img" (without the .gz extension).
root@1:/# ll | grep openwrt-rw-r--r-- 1 root root 126353408 Apr 28 01:52 openwrt-22.03.5-x86-64-generic-ext4-combined.img
Once you have the image downloaded, you can flash it on the HDD with the following command:
dd if=openwrt-22.03.5-x86-64-generic-ext4-combined.img of=/dev/sda bs=4M; sync;
Output should look similar to this:
root@1:/# dd if=openwrt-22.03.5-x86-64-generic-ext4-combined.img of=/dev/sda bs=4M; sync;
30+1 records in
30+1 records out
126353408 bytes (126 MB, 120 MiB) copied, 1.86846 s, 67.6 MB/s
At this point, you have a bootable OpenWRT installation.
You could power
off, remove the USB and boot your PC, but should probably also
complete the last step to gain access to the entire space on the HDD.
To check avalible disks use this commnds:
Number Start End Size Type File system Flags
Number Start End Size Type File system Flags
Number Start End Size File system Flags
root@0:~# ls -l /dev/disk/by-id
total 0
lrwxrwxrwx 1 root root 9 Apr 29 16:30 ata-WDC_WD1600AAJS-60PSA0_WD-WCAP94237178 -> ../../sda
lrwxrwxrwx 1 root root 10 Apr 29 16:30 ata-WDC_WD1600AAJS-60PSA0_WD-WCAP94237178-part1 -> ../../sda1
lrwxrwxrwx 1 root root 9 Apr 29 16:25 usb-JetFlash_Transcend_8GB_C7E09118-0:0 -> ../../sdb
lrwxrwxrwx 1 root root 10 Apr 29 16:25 usb-JetFlash_Transcend_8GB_C7E09118-0:0-part1 -> ../../sdb1
lrwxrwxrwx 1 root root 9 Apr 29 16:30 wwn-0x50014ee100828280 -> ../../sda
lrwxrwxrwx 1 root root 10 Apr 29 16:30 wwn-0x50014ee100828280-part1 -> ../../sda1
root@1:~# sudo lshw -class disk
*-disk
description: SCSI Disk
product: Transcend 8GB
vendor: JetFlash
physical id: 0.0.0
bus info: scsi@6:0.0.0
logical name: /dev/sdb
version: 8.07
serial: C
size: 7660MiB (8032MB)
capabilities: removable
configuration: ansiversion=4 logicalsectorsize=512 sectorsize=512
*-medium
physical id: 0
logical name: /dev/sdb
size: 7660MiB (8032MB)
capabilities: partitioned partitioned:dos
configuration: signature=003844b9
*-disk
description: ATA Disk
product: WDC WD1600AAJS-6
vendor: Western Digital
physical id: 0.0.0
bus info: scsi@3:0.0.0
logical name: /dev/sda
version: 2M22
serial: WD-WCAP94237178
size: 149GiB (160GB)
capabilities: partitioned partitioned:dos
configuration: ansiversion=5 logicalsectorsize=512 sectorsize=512 signature=aab7a21c
Links:
- How To Gain Access to Linode over Finnix SSH in Rescue Mode
- OpenWRT installation instructions for APU2/APU3/APU4 boards
- Openwrt on a Pc.
- How to install OpenWRT on a Bare Metal PC
- OpenWRT - x86 PC - Install to Hard Drive - YouTube | Van Tech Corner - A nice easy to follow video


Комментарии
Отправить комментарий